
While the Information Architecture (IA) concerns determines where the Site Collections should be created at the front end (under which Web App and use what Managed Path), performance is a deciding factor of where to create the site collections at the back end (which database to use).
Putting database files into the right drive.
- If the Site Collection to be created is read intensive, such as publishing Sites, the database data files should be placed into a faster drive than the one used by the database log files.
- If the Site Collection is write intensive, i.e. there will be frequent updates, the database log files should be place into a faster drive than the one used by the database data files.
Another practice is that to separate content databases from the service applications databases in SQL server, putting them into a separate drive. However, through SQL server management studio, you can only specify one location for user databases. The location will be used to create the new databases when any application creates a database in SQL server.
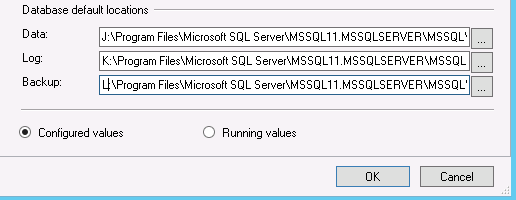
You may want to make it the location (drive) that stores the service applications databases. In this case, you could create service applications in SharePoint Central Administration web site directly. It is a preferable practice to create content databases with scripts in SQL server. In this case, you could specify not only the location for the data files and log files, but also the initial size and auto-growth rate etc. Because usually it is good to give the content databases a bigger initial size and growth rate so it does not have to be growing all the time. This will improve the performance of SQL server (and of course, the SharePoint farm).
A sample script for creating a database is as follows:
USE master;

GO

CREATE DATABASE WSS_Content_Team01

ON

( NAME = WSS_Content_Team01,

FILENAME = 'J:\Microsoft SQL Server\MSSQL12.MSSQLSERVER\MSSQL\DATA\WSS_Content_Team01.mdf',

SIZE = 10240MB,

MAXSIZE = UNLIMITED,

FILEGROWTH = 5120MB )

LOG ON

( NAME = WSS_Content_Team01_LOG,

FILENAME = 'K:\Microsoft SQL Server\MSSQL12.MSSQLSERVER\MSSQL\DATA\WSS_Content_Team01.ldf',

SIZE = 2560MB,

MAXSIZE = UNLIMITED,

FILEGROWTH = 1280MB ) ;

GO

COLLATE LATIN1_General_CI_AS_KS_WS

GO

USE WSS_Content_Team01

GO

sp_changedbowner 'domain\sp.farm'

GO
The script above creates a database named WSS_Content_Team01 in J: drive and place the corresponding transaction logs in K: drive. It also makes sure the DB owner is the farm account. The initial size of the data file is 10 GB with a 5 GB growth rate. So it does not have to grow all the time. By default, the initial size of a new DB is 3 MB and growth rate is 10%, which means, if you upload a 10 MB document, the DB size need to grow tens of times to have the space accommodate it, which drags the performance the whole farm.
After the database in created in SQL server, we could go to SharePoint to create web applications or add new content databases and specify the database name as the one already created in SQL server. In this way, we could attached the created databases in the DB server to SharePoint web applications. Apart from the Central Administration site of SharePoint, we could also use the Mount-SPContentDatabase cmdlet in PowerShell to attach the databases. Here is an example:
Mount-SPContentDatabase “WSS_Content_Sitename01” -DatabaseServer “DB Sever name” -WebApplication http://WebAppURL
Putting Site Collections into the right Content Database
After creating the content databases in the desired drive, we need to make sure site collections are created in the desired content database. When multiple content databases are available in the same web application, if the site collection is being created through Central Administration, there is no place to specify which content database it will enter. SharePoint picks up a content database in round robin fashion. Nevertheless, there are ways to achieve the goal:
If to create it through SharePoint CA, please follow the steps:
1. Navigate to Central Administration >> Application Management >> Database >> Manage content databases
2. Make sure there is only one content database is available for the new site collection. In each of the content databases you would like to EXCLUDE, and set the status as offline. When it is offline, the database can still be updated, but new Site Collections could not be created. This is to make sure only one content database is suitable for creating new site collections.
Apart from taking the content databases offline, you can also set the Maximum number of sites that can be created in this database to the number of existing Site Collections in the content database, so no new site collections can be created any more.
3. Create the Site Collection under the Web Applications.
The approach above can be done all through the GUI, but is not too straightforward. The easiest way may be that through PowerShell. You could specify the content database when you create a Site Collection. This approach become handy when you have more and more site collections to create and content database to manage. There are quite a few different ways to compose the script, please check the TechNet Article for more information: http://technet.microsoft.com/en-us/library/ff607937(v=office.15).aspx Here is one example just for your reference. Please double check the parameters before executing the command.
New-SPSite http://sitename -OwnerAlias “domian\username” -ContentDatabase “wss_content_team01” -Name “Team Site 1” -Description “Test Site” -Template “STS#0″
For the name of the site collection temple you want, you could find it with the commandlet Get-SPWebTemplate.
