Configuring SharePoint and Office Web Apps to Support SSL Offload

When Load Balancing SharePoint Web Servers and Office Web Apps Servers, some organization would like to adopt SSL offload to improve overall network performance. In these organizations, either the communication between the load balancer and SharePoint Servers are closed so no one could possibly listen in, or just that internal regulations allow non-encrypted traffic between the load balancer and the server behind it. They could bind the SSL certificate only at the load balancer, while on the servers behind, port 80 or other ports are used but without SSL.

In the context of a SharePoint Farm, to support this setup, there are certain configurations to be done on SharePoint as well as the Office Web Apps Server farm (provided that there are more than one OWA servers.

Office Web Apps Server Farm

Configure the Office Web Apps farm with the –AllowHTTP and –SSLOffloaded options set to true.

For example, when creating a new Office Web Apps farm with the cmdlet New-OfficeWebAppsFarm, use the parameter –SSLOffloaded. In this case, the value of –AllowHTTP will be set to true automatically. If the server farm has been created without supporting SSL offload, you could simply, use the Set-OfficeWebAppsFarm cmdlet to change the values.

SharePoint Farm

First of all, there is a difference between path-based site collections and host-named site collections.

For path-based site collections:

Configure Alternative Access Mapping to support the SSL Offload.

When SSL is offloaded to the load balancer, the web applications would not be configured to use SSL. However, there is a difference between the URL that users use to access the web application and the URL set at IIS. For example, the URL used by uses is https://sharepoint.contoso.com as SSL is configured at the load balancer, while in SharePoint, the web applications are created as http://sharepoint.contoso.com.  Without AAM accommodating the difference between the internal and external URL, the SharePoint sites may not work properly. One possible behavior is that the browser will warn you that the content is not secure.

To configure AAM to support SSL offload, you should first make sure the public url is set to https:// and then add an internal URL as http://. Simply adding a URL for HTTPS will not work. Here is one way to configure it:

  1. From SharePoint Central Administration navigation pane, click Application Management.
  2. In the main pane, under Web Applications, click Configure alternate access mappings.
  3. From the Internal URL list, click the Internal URL corresponding to the Public URL you want to be accessible through the load balancer.
  4. The Edit Internal URLs page opens.
  5. In the URL protocol, host and port box, change the protocol from http:// to https://.

2014-08-24_1534

  1. Click the OK button. You return to the Alternate Access Mappings page.
  2. On the Menu bar, click Add Internal URLs.
  3. In the URL protocol, host and port box, type the same internal URL used in step 4, but use the http:// protocol. This allows access to the non-SSL site from behind the load balancer.

2014-08-24_1536

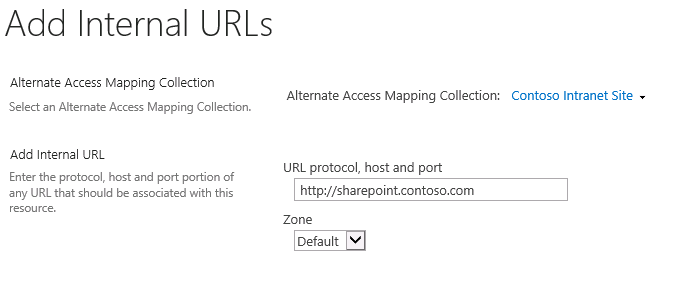
  1. Click Save. The result should look like this:

2014-08-24_1536_001

For host-named site collections:

AAM does not work. You need to configure the load balancer (or the reverse proxy) to add http header. More specific information can be found in this TechNet article: https://technet.microsoft.com/en-us/library/cc424952.aspx#section2g

If you are using F5 load balancer, you can also find a specific user guide for this scenarios for SharePoint: https://www.f5.com/pdf/deployment-guides/microsoft-sharepoint-2016-dg.pdf


Advertisement

DNS Alias vs. SQL Server Alias

Setting alias for SQL Server provides the system extra capability in disaster recovery. In the case of an SQL server outage, the admin could bring online an identical instance (if any) and point the same alias to refer to the new instance. In this case, the clients may not even know the SQL server has been changed at the back end.

Therefore, it is recommended to have and alias in place. However, questions always come up as to the choice between a DNS alias and a SQL Serve alias. This article is for a comparison of the two option.

DNS Alias

Pros

  • It is more resilient (as mentioned at the beginning of the second video here). Once it is setup, all the clients could take advantage of it. In the case of SQL server change, the update is only needed at DNS. All the servers using the same DNS will be able to pick it up.  Of course, DNS cache is not considered here. For example, in a large SharePoint Farm, you don’t have to go into each server to update it.

Cons

  • This usually requires cooperation across teams, which may not be easy for many organizations. SQL Server, SharePoint and DNS are usually managed by different teams or personnel.
  • Single point of failure. If DNS is down, all the clients using the alias will be affected. What’s more, it is sometimes difficult to know who will be affected once the alias is modified because anyone could use it after it is setup.
  • You cannot specify ports. So the applications that connect to the SQL Server should either always remember the port or has to use the default ports.

SQL Server Alias

Pros

  • It is controlled at the application side, by the same team that manages the clients, such as the SharePoint team.
  • If the alias is set after the SharePoint farm is built, it is easier to configure a SQL alias. Just set it in the SQL Server Client Network Utility (Cliconfg.exe) and restart the server or restart the SharePoint services (Todd Klindt has a post that includes this topic). For DNS alias, you will have to reconfigure the farm.
  • You can specify a different port other than the default one. In this case, to applications that connect to SQL Server, they only need to know the alias name.

Cons

  • It has to be updated at every client machine. If you have 10 SharePoint Servers in the farm, you will have to set and update the alias on each one of them.  If you don’t have a way to automate the update, there will be certain time of outage of the system.
  • The same name maybe used by different systems. For example, the alias “SQLDB” can be used for SharePoint to refer to SQL Server A, while on TFS, “SQLDB” is referring to InstanceA on SQL Server 2.  Once there is an integration between the two platforms, there will be potential confusion and problems.

This is my opinion and you may have you own idea about this topic. If you could share your thoughts, I would really appreciate it. 🙂

Redirecting My Sites to Office 365

In this post, I would like to quickly share how to direct the My Site links in the On-prem SharePoint farm to Office 365 tenant.

This includes:

  • OneDrive for Business
  • “Sites” the user is following
  • Newsfeeds
  • “About Me”

It is probably very straightforward for admins to redirect the OneDrive for Business and the Sites page.  You simply need do the following:

  1. In SharePoint 2013 SP1 Central Administration site, navigate to Office 365 >> Configure OneDrive and Sites Links.
  2. On the Configure OneDrive and Sites links page, in the My Site URL box, type the My Site URL that you got from Office 365 portal administration.
  3. Specify an audience. Choose Everyone if you want all of your users to be redirected, or choose Use a specific audience, and type the audience name for the audience that contains your Office 365 users.
  4. If you also want to redirect the Sites page in users’ personal sites, select the Redirect the Sites page check box.
  5. Choose OK.

But what about “About Me”?

After the configurations above, you will still be directed to the on-premises My Site host. And if this is the first time, a My Site will be created for the currently logon user on the SharePoint Server farm. Actually, redirecting the link “About Me” is relatively ease as well. Just register a Trusted My Site Host location in the User Profile Service Application.

  1. On the Central Administration Web site, under Application Management, click Manage service applications.
  2. On the Manage Service Applications page, select the User Profile service application from the list of service applications.
  3. On the ribbon, click Manage.
  4. On the Manage Profile Service page, under My Site Settings, click Configure Trusted Host Locations.
  5. On the Trusted My Site Host Locations page, click New Link to add a trusted My Site host location.
  6. On the Add Trusted Host Location page, enter the URL of the trusted personal site location in the URL box.
  7. In the Description box, enter a description for the trusted personal site location.
  8. Optionally, in the Target Audiences box, either type the user names or group names in the corresponding box or click Browse to select audiences by browsing, and then click OK.

The steps above applies when you would like to host the My Sites of a particular group of people online.  If you would like to have all the My Sites to be hosted on SharePoint online, you could simply update the My Site host in User Profile Service Application.

  1. On the Central Administration Web site, under Application Management, click Manage service applications.
  2. On the Manage Service Applications page, select the User Profile service application from the list of service applications.
  3. On the ribbon, click Manage.
  4. On the Manage Profile Service page, under My Site Settings, click Setup My Sites.
  5. Update the My Site Host Location with the URL of the My Site Host on SharePoint online, for example: https://domain-my.sharepoint.com/PersonImmersive.aspx

Please note that the part /PersonImmersive.aspx will make sure the users get to their My Sites directly.  If you only put https://domain-my.sharepoint.com/, the users will be led to OneDrive online instead.  Additionally, in order for the redirection to work completely, you will need to do the following as well:

  • Create an Audience include the users whose My Sites will be redirected.
  • Synchronize user accounts to Office 365.

These topics are not discussed in this post.

Background information:

As Office 365 gains more and more popularity, more and more organization are implementing hybrid model with SharePoint both on-premises and Online. With Microsoft’s announcement on boosting OneDrive for Business to 1 TB, more and more organization would like to adopt Office 365 to provide great capacity for business users while saving IT cost. However, not all the organizations are ready or suitable for hosting their SharePoint environment online completely. Therefore, a hybrid model is the choice of many organizations. Typically, they host their collaborative and publishing sites on-premises for security, compliance reasons or for the flexibility of customization, while My Sites and social features are hosted on Office 365 so they could benefit from large storage capacity as well as up-to-date social features that Microsoft offers.

Is an Internet-facing IP Address Needed for Office Web Apps server 2013?

The answer is yes if the users will access SharePoint with OWA from Internet. This may be a little surprising from network security point of view. What’s more, by viewing the diagram below on TechNet, it seems you need an internet-facing IP only if there are file hosts ( e.g. Exchange server) that uses the OWA server from the internet.


Therefore, it seems that if all your server setups are in your internal network (including the Office Web Apps Server farm, SharePoint, Exchange, Lync etc.), you don’t need to purchase an IP for the Office Web Server farm.

However, if you have users accessing SharePoint from the internet and would like to use Office Web App server, it does not work if a user’s browser could not call the Office Web Apps Server farm directly from the internet. That’s is why you need a public facing IP. This is how OWA Server works. To find out why, let’s look at how OWA works under the hood.

The key part of the integration is that Office Web Apps use the WOPI API to communicate with SharePoint 2013. So in order to understand why public (Internet-facing) IP is needed, we need to look at how WOPI API works.

First things first, let’s review a few definitions to avoid possible confusion.

  • WOPI host – As defined in this blog, a WOPI host is document storage location that can connect to Office Web Apps Server to open Office documents in the browser. In this case, it’s SharePoint.
  • WOPI Client – A WOPI client is an application that uses the WOPI API to perform actions (such as view and edit) on the files stored in the WOPI host. In our case, it’s the Office Web Apps.

Nick Simons had an awesome blog post introducing how Office Web Apps works.  I am borrowing a diagram he used here:


Here is what happens when a user request viewing a file in SharePoint using Office Web Apps Server:

  1. Users issue a request to SharePoint to view the document.
  2. SharePoint navigates the user to a page that contains a WOPI frame that knows how to talk to Office Web Apps.
  3. The WOPI frame contains an iframe that navigates the user to a page in the Office Web Apps Server which shows the content rendered from SharePoint.
  4. User browser sends the WOPI source (including the name and the URL of the file that the user requested to view), and the access token (a string that represents the user’s credential for the Office Web Apps to use to request the file from SharePoint).
  5. Office Web Apps Server uses the WOPI Source and the Access Token to get the file from SharePoint.
  6. The Office Web Apps server displays the file in the iframe on WOPIFrame.

We could see that the WOPI source and the access token are sent from the browser directly. Since all the content are shown from a page within SharePoint that contains the WOPI frame and the iframe, even users see that the URL in the browser is still in SharePoint, the browser is already communicating directly with the Office Web Apps server under the hood.

The MSDN documentation of the WOPI API confirms this:


Therefore, when preparing the for the Office Web Apps server setup in your organization, you will need a public facing IP for the Office Web Apps Server farm.

Ready More:

Plan Office Web Apps Server

Introducing Office Web Apps Server

Introducing WOPI