SharePoint Infrastructure Workshop Topics

I’ve run Infrastructure Workshops for many SharePoint implementation projects over the years. The objective of the workshop is to figure our how the farm(s) will be implemented in the customer’s environment. A few important decisions are made based on the outcome of the workshop:

  • Server and storage sizing
  • Network placement
  • Service account management
  • DR strategy
  • Farm configuration
  • etc.

I am sharing the checklist here in case it helps. 🙂 Feel free to leave your questions or feedback in the comment.

Infra Workshop Topics

Advertisement

SharePoint Three-Tier Network Zoning Architecture

This topic came when there were policies in some organizations that require SharePoint to comply with the “three-tier architecture” requirement, meaning WFE, APP and DB should be in three network zones, and WFEs CANNOT connect to the DBs directly! It is common to see SharePoint farms servers placed in three zones, but most of the time WFEs are allowed to connect to the DB Server. However, this is not acceptable to the organizations that has the “three-tier” policy in place.

I saw in some projects a proxy server is implemented in the APP zone to bridge WFE and DB. It works. However, that proxy can easily become a bottleneck in larger implementations. So far the most common way of implementation is to place one or multiple reverse proxies in the Web zone as the web layer, shifting the SharePoint WFEs to the App zone together with the App servers.

{update April 2018} What I propose in this post is an alternative using technologies on SharePoint. However, based on practical experiences, this approach is more theoretical than practical. So far, there is no production implementation yet. {/update April 2018}

This alternative approach leverages the Request Management of SharePoint. With that you may say SharePoint actually supports the 3-tier requirement. How Request Manager works is elaborated on TechNet. The design here is to:

  • Put the WFEs in the APP Zone so they can connect to the databases directly.
  • Put a dedicated request management farm in the Web Zone in between the Load Balancer and the WFEs, with databases in the same zone.

Good 3-thier Architecture

This way, the Request Management layer serves as the web layer interacting with user requests. The WFEs in the APP Zone become the content serving components that retrieve data from the databases at the back end, while they are in the secure internal APP network zone.

Q: is it OK to place a database server of the Request Management farm in the web zone?

A: Yes, there is no user data stored in the database, only farm service configuration data. And the firewall rules should be restricting network traffic to the DB server to come only from the Request Management Farm servers.

Q: When the actual WFEs in the APP zone servers content back to the users, do they transfer it directly to the users?

A: No, it responds back to the users through the Request Management farm. This is actually the key part that makes the architecture above possible as users are not able to reach the App Zone.

Q: Should Office Web Apps Server be placed in the Web Zone or the same zone as the actual WFEs?

A: It must be reachable by the end users directly, so it should be more suitable to be in the Web Zone.

PS: The diagram below shows a bad design example that uses a proxy:

Bad 3-tier Architecture

Real Zero-Downtime Patching in SharePoint 2016

It is exciting to have Zero-Downtime Patching (ZDP) capability in SharePoint 2016. However, it requires more effort than most of us might have initially thought. While it is straightforward for other components, it requires a bit more care on Distributed Cache.

Distributed Cache doesn’t support High Availability the way that other services do. While multiple Distributed Cache servers in your SharePoint farm can help distribute the load, the data cached on each Distributed Cache server is NOT replicated to the other Distributed Cache servers. If a Distributed Cache server unexpectedly goes down, the data cached on that server will be lost. That means if you install patches and upgrades a Distributed Cache server without gracefully shutting it down, you will cause data lost!

One may argue that if there are three Distributed Cache hosts on the farm, there will be high availability for the Distributed Cache as AppFabric has as cluster quorum model. That is not true as SharePoint is not using that model!

Therefore, if you have workloads that heavily depends on Distributed Cache and have high availability requirements, add Gracefull Shutdown of the Distributed Cache Service into the patching process to have true Zero-Downtime.

Gracefully shutdown DCS: https://technet.microsoft.com/en-us/library/jj219613.aspx#graceful

Monitor SharePoint 2013 Search Components with PowerShell

This is a prototype for a PowerShell script that monitors the status of each component of Search Service Application in SharePoint 2013. This script can be saved  to a .ps1 file and run by the Window Task scheduler periodically. If it detects that any of the component is not in the “Active” state, it automatically sends an email to the administrator.


Add-PSSnapin Microsoft.SharePoint.PowerShell
#Declare variables for later use.
$ssa = Get-SPEnterpriseSearchServiceApplication
$status = Get-SPEnterpriseSearchStatus -SearchApplication $ssa
#Create an empty array to store any component that is not active.
$unhealthy = @()
#Loop through each component status, and store any one that is not active to the array.
$number = 0
$status | foreach {
if ($_.state -ne "active"){
$number++
$unhealthy +=$number.ToString() + ". " + $_.name + "`n"
}
}

#If there is any component that is not active, send an email to the admin with the component name in the email body.
if ($unhealthy.count -gt 0) {
$result = "The components below are not active:`n " + $unhealthy
$params = @{'To'='whomitmayconcern@company.com'
'From'='admin@company.com'
'Subject'='Attention! Search Service Components Unhealthy'
'Body'=$result
'SMTPServer'='smtp.contoso.com'}
Send-MailMessage @params
}

The script has been tested with a single server farm with a single Search Service Application. If your scenario is different, you should adjust the script accordingly.

Batch Enabling Auditing across Many SharePoint Sites

If you are only looking for the script and are not interested what else I say, just grab them here:

#Define the function Enable-Auditing. The URL parameter accepts pipeline input. It also enables log trimming, and log retention time is set to 30 days. This part is kind of "hardcoded", but it should not be too difficult to change it. 
function Enable-Auditing {
param([Parameter(Mandatory=$True,ValueFromPipeline=$True,ValueFromPipelineByPropertyName=$True)]$Url,
[Parameter(Mandatory=$True)]$AuditedActions);
$site = Get-SPSite $Url;
$site.TrimAuditLog = $true;
$site.AuditLogTrimmingRetention = 30;
$site.Audit.AuditFlags = $AuditedActions;
$site.Audit.Update();
$site.Dispose();
}
<# 
Run the commands to apply the settings to specific Site Collections. For the -AuditedAction parameter, input any of the following:
"All" to audit all auditable actions.
"None" to disable auditing
An array of action names to enable auditing a specific set of actions to audit, e.g. "Update", "Delete", "Search". 
Check MSDN documentation for a complete list of auditable actions: https://msdn.microsoft.com/en-us/library/microsoft.sharepoint.spauditmasktype.aspx
#>
Enable-Auditing -URL https://teamsite.contoso.com -AuditedActions "Update", "Delete"

As the -URL parameter accepts pipeline inputs, batch action can be done to multiple site collection with one line of command such as the one below:

#The command below enables auditing Update and Delete actions on all Site Collections whose URL contains "hr".
Get-SPSite -WebApplication http://teamsite.contoso.com -Limit All | ? {$_.url -like "*hr*"} | ForEach-Object {Enable-Auditing -Url $_.url -AuditedActions "Update", "Delete"}

OK, if you are interested in my monologue discussing this function, please read on. Otherwise, the content above is all you need.

How do you make sure auditing is enabled all the time? How may Site Collections do you need to manage? Does each Site Collection has its own Site Collection Administrator?

Site Collection Administrators has the permission to change site audit settings. That’s a potential risk since they can intentionally or unintentionally change the audit settings, while auditing is usually an organization-wide policy that needs to be enforced. Sometimes, turning on unnecessary auditing is bad as well as it will make the content DB grow faster. A single piece of audit log is about 1KB. Imagine, 1000 people are visiting 100 locations in a day!

One solution is to create a PowerShell scripts running under a task scheduler that enforces auditing policies, including:

  • Actions to audit
  • Whether to enable audit log trimming
  • If log trimming enabled, how many days of log to retain

In SharePoint Management Shell, there is no direct cmdlet for this purpose yet. We can define a function to make batch operations easier.

If you run Get-Member on a SPSite object, you will find that there are a few properties related to auditing:

  • Audit
  • AuditLogTrimmingCallout
  • AuditLogTrimmingRetention

To enable/disable auditing, the trick is to set the value of the SPSite.Audit.AuditFlags property. Based on tests, it accepts strings or array of strings. So there comes the code at the beginning of this post.

Move SharePoint 2013 Search Index Location

Task: Move search index from D: drive to E: drive on the existing Index Servers.
Search topology:

Search_Topology

Preparation:

#Discover current search topology information with documentation.

$ssa = Get-SPEnterpriseSearchServiceApplication
$old = Get-SPEnterpriseSearchTopology -SearchApplication $ssa -Active
Get-SPEnterpriseSearchServiceApplication >C:\SSA_Info.txt
Get-SPEnterpriseSearchComponent -SearchTopology $old >c:\oldtopology.txt
Get-SPEnterpriseSearchStatus -SearchApplication $ssa

#Define parameters for the move.

<# $hostA = Get-SPEnterpriseSearchServiceInstance -Identity "Server1" $hostB = Get-SPEnterpriseSearchServiceInstance -Identity "Server2" #>
$hostC = Get-SPEnterpriseSearchServiceInstance -Identity "Server3"
$hostD = Get-SPEnterpriseSearchServiceInstance -Identity "Server4"
$hostE = Get-SPEnterpriseSearchServiceInstance -Identity "Server5"
$hostF = Get-SPEnterpriseSearchServiceInstance -Identity "Server6"
$indexPath = "E:\Search_Index01"

#Clone the current active topology

$clone = New-SPEnterpriseSearchTopology -SearchApplication $ssa -Clone -SearchTopology $old

#To the cloned topology, add new Index components using new path.

New-SPEnterpriseSearchIndexComponent -SearchTopology $clone -SearchServiceInstance $hostC -IndexPartition 0 -RootDirectory $indexPath
New-SPEnterpriseSearchIndexComponent -SearchTopology $clone -SearchServiceInstance $hostD -IndexPartition 0 -RootDirectory $indexPath
New-SPEnterpriseSearchIndexComponent -SearchTopology $clone -SearchServiceInstance $hostE -IndexPartition 1 -RootDirectory $indexPath
New-SPEnterpriseSearchIndexComponent -SearchTopology $clone -SearchServiceInstance $hostF -IndexPartition 1 -RootDirectory $indexPath

#Set the new (cloned) topology as active. This step takes the most time.

Set-SPEnterpriseSearchTopology -Identity $clone

#Discover the component info in the new topology.

Get-SPEnterpriseSearchComponent -SearchTopology $clone >c:\InterimTopology.txt

#Confirm that all the components are ready. Also check in the Central Admin Site for the status.

Get-SPEnterpriseSearchStatus -SearchApplication $ssa

Remove the older index components. ONLY DO THIS AFTER NEWLY ADDED INDEX COMPONENTS ARE ACTIVE. You need to clone the latest topology and modify the new cloned topology. Then set the new clone as active when modification is done. Double Check in the InterimTopology.txt the info on the components to identify the components to remove.

IndexPartitionOrdinal : 0
RootDirectory : E:\Search_Index01
ComponentId :
TopologyId :
ServerId :
Name : IndexComponent4
ServerName : SearchServer04

$active = Get-SPEnterpriseSearchTopology -SearchApplication $ssa -Active
$newclone = New-SPEnterpriseSearchTopology -SearchApplication $ssa -Clone -SearchTopology $active

$comp1=Get-SPEnterpriseSearchComponent -SearchTopology $newclone | ? {$_.Name -eq "IndexComponent1"}
$comp2=Get-SPEnterpriseSearchComponent -SearchTopology $newclone | ? {$_.Name -eq "IndexComponent2"}
$comp3=Get-SPEnterpriseSearchComponent -SearchTopology $newclone | ? {$_.Name -eq "IndexComponent3"}
$comp4=Get-SPEnterpriseSearchComponent -SearchTopology $newclone | ? {$_.Name -eq "IndexComponent4"}

Remove-SPEnterpriseSearchComponent -Identity $comp1 -SearchTopology $newclone
Remove-SPEnterpriseSearchComponent -Identity $comp2 -SearchTopology $newclone
Remove-SPEnterpriseSearchComponent -Identity $comp3 -SearchTopology $newclone
Remove-SPEnterpriseSearchComponent -Identity $comp4 -SearchTopology $newclone

Set-SPEnterpriseSearchTopology -Identity $newclone

# Optionally, you can use a for loop to run through a list of components to remove. But I prefer the lines above as it shows explicitly the actual action to take.

#Confirm that all the components are ready. Also check in the Central Admin Site for the status.

Get-SPEnterpriseSearchStatus -SearchApplication $ssa

#Discover the component info in the final topology.

Get-SPEnterpriseSearchComponent -SearchTopology $newclone >c:\FinalTopology.txt

#Remove the old topologies

Get-SPEnterpriseSearchTopology -SearchApplication $ssa
Remove-SPEnterpriseSearchTopology -Identity < > 

Getting Rid of GUIDs in DB names in an Exiting SharePoint Farm

DBAs hate the GUID appended to a database name. Everyone does! But that will happen if the farm and the Service Applications within are created with a wizard.

Example:

With_GUIDs

To make sure the database names are “clean”, farm admins can create the farm using psconfig.exe and create the Service Applications and Content Catabases with PowerShell. But what if a farm has been created and the databases already have GUID in their names? When you just take over a new farm, this may be the case, and you may be lucky enough to be assigned the task to change the names. 🙂

Just do the steps below to get rid of the GUIDs:

For the Central Administration site content database, you need to move the site to a new Content Database. Follow the steps:

  1. Create a new databases with proper names and configuration.
  2. Move the sites with Move-SPSite PowerShell cmdlet to move the sites to the new databases.
  3. Verify the sites are working correctly after the move.
  4. Delete the old databases.

For the user Content Databases, you can rename the databases. Follow the steps:

  1. Dismount the database from SharePoint Web Applications with Dismount-SPContentDatabase PowerShell cmdlet.
  2. Rename the dismounted database in SQL Server with ALTER DATABASE T-SQL command or in the Object Explorer.
  3. Mount the renamed database to SharePoint Web Applications with Mount-SPContentDatabase PowerShell cmdlet.

For Service Application databases, you need to rename the databases with additional actions and it is specific to each service application. Check this TechNet article to find information for the service applications you are using.

Example:

No_GUIDs

Done!

Getting Prompted for Login Repeatedly

If you encounter repeated login prompt even when the credential entered is correct, there are some common solutions that can help. If the issue persists after all these solutions are in place, systematic troubleshooting will be needed.

Here are the common areas to check, on the clients and the servers.

Client Side Solutions

Add the team Web site to the list of trusted intranet sites

To do this, complete the following steps:

  1. On the Internet Explorer toolbar, click Tools, and then click Internet Options.
  2. In the Internet Options dialog box, click the Security tab, and then select Local intranet.
  3. Click Sites, and then click Advanced.
  4. Type the URL of the team Web site in the Add this Web site to the zone box, click Add, and then click OK.

Bypass proxy server for local addresses

To bypass your Internet proxy for local addresses in Microsoft Internet Explorer 5 or later, complete the following steps:

  1. On the Internet Explorer toolbar, clickTools, and then click Internet Options.
  2. In theInternet Options dialog box, click the Connections tab, and then click LAN Settings.
  3. UnderProxy server, select the Bypass proxy server for local addresses check box, and then click OK.

Make sure Integrated Windows Authentication is enabled.

Make sure Integrated Windows authentication is enabled in IE. (Tools >> Internet Options >> Advanced >> under security, enable integrated authentication)

Add the entry to the Credentials Manager

  1. Go to Start > Run and type in control keymgr.dll to open the Windows key manager.
    Alternatevily: navigate to Contorl Panel > User Accounts > Manager Windows Credentials
  2. Select Add a generic credential
  3. Add yourSharePoint site URLlogin and password to the corresponding fields. If this entry already exists, edit it to have your login credentials.
  4. Reboot the computer.

If you are missing the Add button, you may want to modify Windows Registry to be able to save the password.

Note: for editing Windows Registry, administrator rights are required. Editing Windows Registry is not safe and users will perform it at their own risk.

  1. In Windows, go to Start > Run and enter regedit.
  2. Navigate to HKEY_LOCAL_MACHINE\System\CurrentControlSet\Control\Lsa\.
  3. Find the DisableDomainCreds A value of 1(enabled) will prevent you from saving new credentials.
    Change the value to 0 and reboot. Now you should have the Add button available. Note that 0 is the default value.
  4. Also check the LmCompatibilityLevel It should be set to 3, which is the default value. If you have another value, change it to 3. If it does not work with 3, then also try it with 2.
  5. Reboot the computer to apply changes.

If the client PCs are using Windows 7, some hotfixes may be needed:

https://support.microsoft.com/en-us/kb/943280

The solutions below are specific to the “Open with Explorer” function. If you get prompted for login repeatedly when using “Open with Explorer” after trying the configurations above, you can try the solutions below.

Restart WebClient Service

  1. Click Start > Run
  2. Enter ‘services.msc’
  3. Find the WebCient service and select Restart

Check Internet Explorer Version

  • Windows 7: Internet Explorer 10 is not yet compatible with the You will need to revert to Internet Explorer 9.
  • Windows 8: Internet Explorer 10 is compatible, so you should not have an issue with this OS and browser version combination.

Server Side solutions

Specify Host Names on each SharePoint Web Front End. (Preferred method over disabling loopback check)

To do this, follow these steps for all the nodes on the client computer:

  1. Click Start, click Run, type regedit, and then click OK.
  2. In Registry Editor, locate and then click the following registry key:

HKEY_LOCAL_MACHINE\SYSTEM\CurrentControlSet\Control\Lsa\MSV1_0

  1. Right-click MSV1_0, point to New, and then click Multi-String Value.
  2. Type BackConnectionHostNames, and then press ENTER.
  3. Right-click BackConnectionHostNames, and then click Modify.
  4. In the Value data box, type the host name or the host names for the sites that are on the local computer, and then click OK.
  5. Quit Registry Editor, and then restart the IISAdmin service.

Client and Server Coordination

Make sure the NTLM Level is the same among Domain Controllers, SharePoint Servers and Clients

This can be pushed down from a Domain Controller using GPO (Group Policy Object).

  1. Use Group Policy Editor (GPE) to open the Group Policy Object (GPO) you want to modify. You can create a policy that applies to the OUs that contains the DCs, SharePoint Servers, and user clients.
  2. Navigate to Computer Configuration, Windows Settings, Security Settings, Local Policies, Security Options.
  3. Double-click the “Network security: LAN Manager authentication level” policy.

You can choose a level that is acceptable to your internal security policy, Just make sure you use the same level across DCs, SharePoint Servers and clients.

  1. Select “Define this policy setting” and from the drop-down menu select the desired level.
  2. Click OK.
  3. Close the GPO.
  4. To make the modification effective immediately, run gpupdate /force on all the servers and clients.

Why you need to host Intranet and Internet sites in separate farms?

If you have both Intranet sites and a public facing portal, it is usually recommended to host them separately in their own farms instead of sharing the same farm. Some may argue that these two types of site can actually be hosted on the same farm as long as they are separate web applications using different application pools and even separate instances of the same service applications. However, there still are factors to be considered:

  • Security – The servers of Internet-facing website are close to external access. It is a recommended security practice to separate servers hosting intranet from those serving internet-facing websites. In this case, intranet farms servers could be placed in an internal network zone with no internet access.
  • Performance optimization – Intranet sites and internet-facing web site have different usage patterns. Internet-sites are primarily read-intensive, while intranet sites have more user updates. The configuration for these two types of environment are different. For example, in database server hosting content databases, the transaction log files of write-intensive databases should be put in a faster drive than that of the data files. For read-intensive databases, the configuration is quite the other way.
  • Scalability – The growth pattern and scaling requirement is usually different between intranet websites and internet websites. Take the sizing of one of my customers’ SharePoint farm as an example, the intranet portal has a content database of more than 50 GBs while the total size of each of the internet web applications is only around 1 GB. The user traffic growth pattern may be different as well. The intranet traffic is basically predictable based on the growth of internal users. That of the internet farm may change quite drastically if the website becomes more and more popular.
  • Maintainability – The maintenance schedule is usually different between internal intranet and internet-facing sites. Farm maintenance task often involves, solution deployment, IIS reset and even server reboot. Separating sites into two farms will ensure maintenance on Intranet farm does not impact the internet-facing websites. What is more, internet-facing sites have the most stringent SLA. Correspondingly, a dedicated high availability and maintenance schedule should be implemented.

Notes on ADFS for SharePoint

When deploying ADFS for SharePoint, there are a few considerations. Using ADFS for SharePoint is not just another authentication method, if will affect quite a few functionalists that we even take for granted. Here are some of the common situations that SharePoint customers will encounter when they implement ADFS for SharePoint.

Zoning for web applications.

Check out the dedicated
blog post for a detailed discussion about this topic.  Very likely, you will need to use ADFS in a non-default zone. The root cause is that search crawl does not work without Window Authentication.

People picker 

People picker is not working properly in the zone that uses ADFS.  It is accepting all the user claims.  Please refer to the attached screenshot for one example. Basically, anything users type in the People Picker will be accepted although there is no such user in Active Directory, just like in the picture below:

People picker

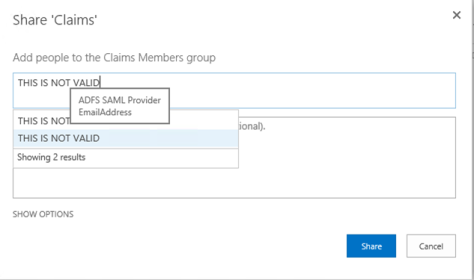
This is a known issue. As stated on TechNet (http://technet.microsoft.com/en-us/library/gg602078(v=office.15).aspx), “when you use SAML token-based authentication, all queries entered in the text box are automatically displayed as if they were resolved, regardless of whether they are valid users or groups”.  Therefore, we need to implement a custom claims provider in SharePoint, so SharePoint could query AD directly and the People Picker will work properly.  We could find from the internet a sample of such custom claims provider: http://ldapcp.codeplex.com/.

User Profile Sync

You will need to configure User Profile Service Application separately for ADFS.  Otherwise, users authenticated through ADFS will not be able to have their profiles synced from AD and consequently not populated to the site collections. They will not be able to use the functions dependent on user profiles, for example outgoing email service (simply because there is no email address in the user profile).

After the basic setup of ADFS for SharePoint, a User Profile Synchronization connection and a User Property mapping needs to be set up to make sure ADFS users’ properties are synced. Here are the steps to create a Profile synchronization connection to a directory service for ADFS users.

a.On the Add new synchronization connection page, type the synchronization connection name in the Connection Name box: User Profile Sync for ADFS.
b.From the Type list, select the type of directory service to which you want to connect.
c.Fill in the Connection Settings section according to the directory service to which you are creating a connection.
d.In the Forest name box, type the name of the forest.
e.Click Specify a domain controller and type the domain controller name in the Domain controller name box.
f.In the Authentication Provider Type box, select Trusted Claims Provider Authentication.
g.In the Authentication Provider instance box, make sure ADFS is selected.

h.In the Account name box, type the synchronization account domain\sp.profile.

i.In the Password box, type the password for the synchronization account.
j.In the Confirm Password box, type the password for the synchronization account again.
k.In the port box, enter the connection port 389.

l.In the Containers section, click Populate Containers, and then select the containers from the directory service that you want to synchronize.
m.Click OK.

Here are the steps for mapping User Properties for ADFS users.
a) On the Manage Profile Service page, in the People section, click Manage User Properties.
b) Click Claim Provider Identifier and choose Edit.
c) The mapping should have been configured automatically when the Synchronization connection was created. Make sure attributed ADFS is imported for the Connection User Profile Sync for ADFS.
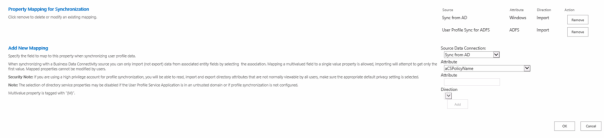
Auto-ed

d) Click OK.
e) On the Manage User Properties page, click claim User Identifier.
f) For the source User Profile Sync for ADFS, import email as the Claim User Identifier.
Last

Audience:

For the users authenticated through ADFS, Audience does not work even your have synchronized user profilers to SharePoint. You will need to create users manually or implement custom codes. If you would like to create users manually, create the profiles with their proper claims attributes—for example, i:05:t|AD FS with
roles|name@contoso.com as the account name—and then populate the other fields with data that you want to use in your audiences. However, without implementing custom codes, you cannot use a user-based audience, such as membership in a group, for the audience.  You implement custom code in order to do that. It might be more efficient to use the property-based audience in this case.

This TechNet article mentioned this limitation:
http://technet.microsoft.com/en-us/library/dn720355(v=office.15).aspx

Other known issues:

A few things don’t work, such as search alerts. Search Alerts does not work with SAML security tokens (generated by ADFS). On TechNet, there is an article that covers this topic for SharePoint 2010:
http://technet.microsoft.com/en-us/library/hh706161.aspx There seems no improvement in this area in SharePoint 2013.

There are more issues if you are using an older version of SharePoint or ADFS. However, the good news is there are some updates if you are using SharePoint 2013 and ADFS 3.0.  For example, check out this blog for how to make SharePoint hosted apps work with ADFS 3.0:

http://www.wictorwilen.se/sharepoint-2013-with-saml-claims-and-provider-hosted-apps

Alerts

If there have multiple zones, and the users subscribe to an alert from a non-default zone, in the email they receive about the alerts, the links are linked to the default zone.  This can only be resolved by custom codes. For a solution, you could check out this blog post:
https://timpanariuovidiu.wordpress.com/2014/06/23/sharepoint-2013-alerts/

Groups claims

For the LDAP attributes being passed to SharePoint as outgoing claims, you could pick up the one you need.  You could just use one sole attribute if you only would like to authenticate individual users.  You could for example only pass Email address, and all users will be able to get authenticated with their email addresses. However, if you could like to grant permissions to security groups in AD for ADFS users, you will need to pass group claims. The way to do it is to firstly in ADFS, make sure the LDAP attribute “Token-Groups – Unqualified Names” is mapped to the outgoing claim type “Role”. In this case, the sAMAccountName of the security groups will be passed to SharePoint as plain text.

BTW, if you forget to do this when the trusted token issuer (ADFS) was created, you could either recreated it including the “role” claim mapping or just update the existing one.  Here is the script to use:

$issuer = Get-SPTrustedIdentityTokenIssuer
$issuer.ClaimTypes.Add("http://schemas.microsoft.com/ws/2008/06/identity/claims/role")
$map=New-SPClaimTypeMapping "http://schemas.microsoft.com/ws/2008/06/identity/claims/role" -IncomingClaimTypeDisplayName "Role" -SameAsIncoming
$issuer.AddClaimTypeInformation($map)
$issuer.Update()

For the URI of each type of claim, you could refer to this article:

http://technet.microsoft.com/en-us/library/ee913589.aspx

Browser support

When implementing ADFS for SharePoint, you will encounter a few issues.  Some of the actually have been mentioned above.  I discovered one issue with Chrome in one the projects, and it has a solution.  You could check out this blog for details:
http://jackstromberg.com/2014/03/adfs-v3-on-server-2012-r2-allow-chrome-to-automatically-sign-in-internally/